How to Extend the Engine with a Plugin
In this tutorial you will learn how to extend the Imixs Workflow engine. In Tutorial Part-1 you modeled a workflow and ran it with Docker, without writing any code. Now you will look behind the scenes and extend the engine with your own business logic. This tutorial is for Java developers.
The workflow engine in your Docker stack in Tutorial Part-1 is the Imixs-Microservice. It runs the Imixs-Workflow engine as a Jakarta EE application on WildFly and publishes the REST API that the Imixs Web Forms talk to. The project also contains two Java examples showing how to extend the engine.
In this tutorial you will learn:
- How the Imixs-Microservice is structured
- How a Plugin works and how it differs from an Adapter
- How to bind a Plugin to an event in your BPMN model
- How to run your own build of the engine and see the result
Before you get started, ensure you have:
- The project from Tutorial Part-1
- Git and Docker
- JDK 17 and Maven 3
How the Docker Stack Works
The Docker image contains the engine as a web application on WildFly. The application is stored as an unpacked directory inside the container. That is why the web app from Tutorial 1 can simply be mapped as a volume into this directory, next to the engine's REST API.
In this tutorial you will replace the engine in this stack with your own build.
Step 1 - Clone the Sources
Clone the Imixs-Microservice project:
$ git clone https://github.com/imixs/imixs-microservice.git
$ cd imixs-microservice
This clone is your playground for this tutorial. If you later want to build a real service with your own plugins, you will set up a separate project (see “What's Next”).
The application is a standard Maven project. Two places are interesting for us:
src/main/java/org/imixs/microservice/ImixsApplication.javadefines the REST API endpoint/apisrc/main/java/org/imixs/microservice/example/contains the example classesDemoPluginandDemoAdapter
Step 2 - Take a Look at the Plugin
A Plugin is a Java class that is executed each time a BPMN event is processed. This is the DemoPlugin:
public class DemoPlugin extends AbstractPlugin {

    // inject services...
    @Inject
    ModelService modelService;

    private static Logger logger = Logger.getLogger(DemoPlugin.class.getName());

    public void init(WorkflowContext actx) throws PluginException {
        // here we can initialize optional components
    }

    public ItemCollection run(ItemCollection workitem, ItemCollection adocumentActivity)
            throws PluginException {
        // test model service
        List<String> versions = modelService.getVersions();
        for (String aversion : versions) {
            logger.info("ModelVersion found: " + aversion);
        }

        // add a custom item
        workitem.setItemValue("_some_item", "Hello World");
        return workitem;
    }

    @Override
    public void close(boolean rollbackTransaction) throws PluginException {
        // here we can react on a rollback transaction
    }
}
The method run() is the important one. The engine passes the process instance (workitem) and the BPMN event that is currently processed. The Plugin can read and change the data and returns the process instance to signal that the processing can continue. If a Plugin returns null or throws a PluginException, the whole transaction is rolled back.
The @Inject annotation tells the application server to provide the ModelService to the Plugin. You do not create the service yourself with new. This is how a Plugin can use any service of the engine.
You can find a detailed description of the Plugin life-cycle in the Plugin API.
Step 3 - The Adapter
The DemoAdapter in the same directory does almost the same, but it is bound differently:
- A Plugin is added to the Workflow section of an event in your BPMN model.
- A SignalAdapter is bound to a single event by a BPMN signal definition that contains the class name of the adapter. It is executed before the Plugins.
In this tutorial we use the Plugin. See the Adapter API for more information about adapters.
Step 4 - Build Your Own Image
Build the project and a Docker image with your own name my-workflow-service:
$ mvn clean install -Pdocker -Ddocker.image=my-workflow-service
When the build is finished, you have your own new local Docker image named my-workflow-service. You can check this with:
$ docker images my-workflow-service
Step 5 - Use Your Image in the Docker Stack
Open the docker-compose.yml of the project from Tutorial 1 and replace the image name of the app service with your own new image:
  ...
    app:
        image: my-workflow-service
  ...
Everything else stays unchanged. The web app and the models are still mapped as volumes into the container.
Step 6 - Bind the Plugin to you Model
To activate you Plugin you simply need to add the plugin into the plugin list of your BPMN model.
Open the model bpmn/ticket-en-1.0.0.bpmn with the Open-BPMN modeler in VS Code and select the properties of the default process. In the section Workflow add the class name of the Plugin:
org.imixs.microservice.example.DemoPlugin
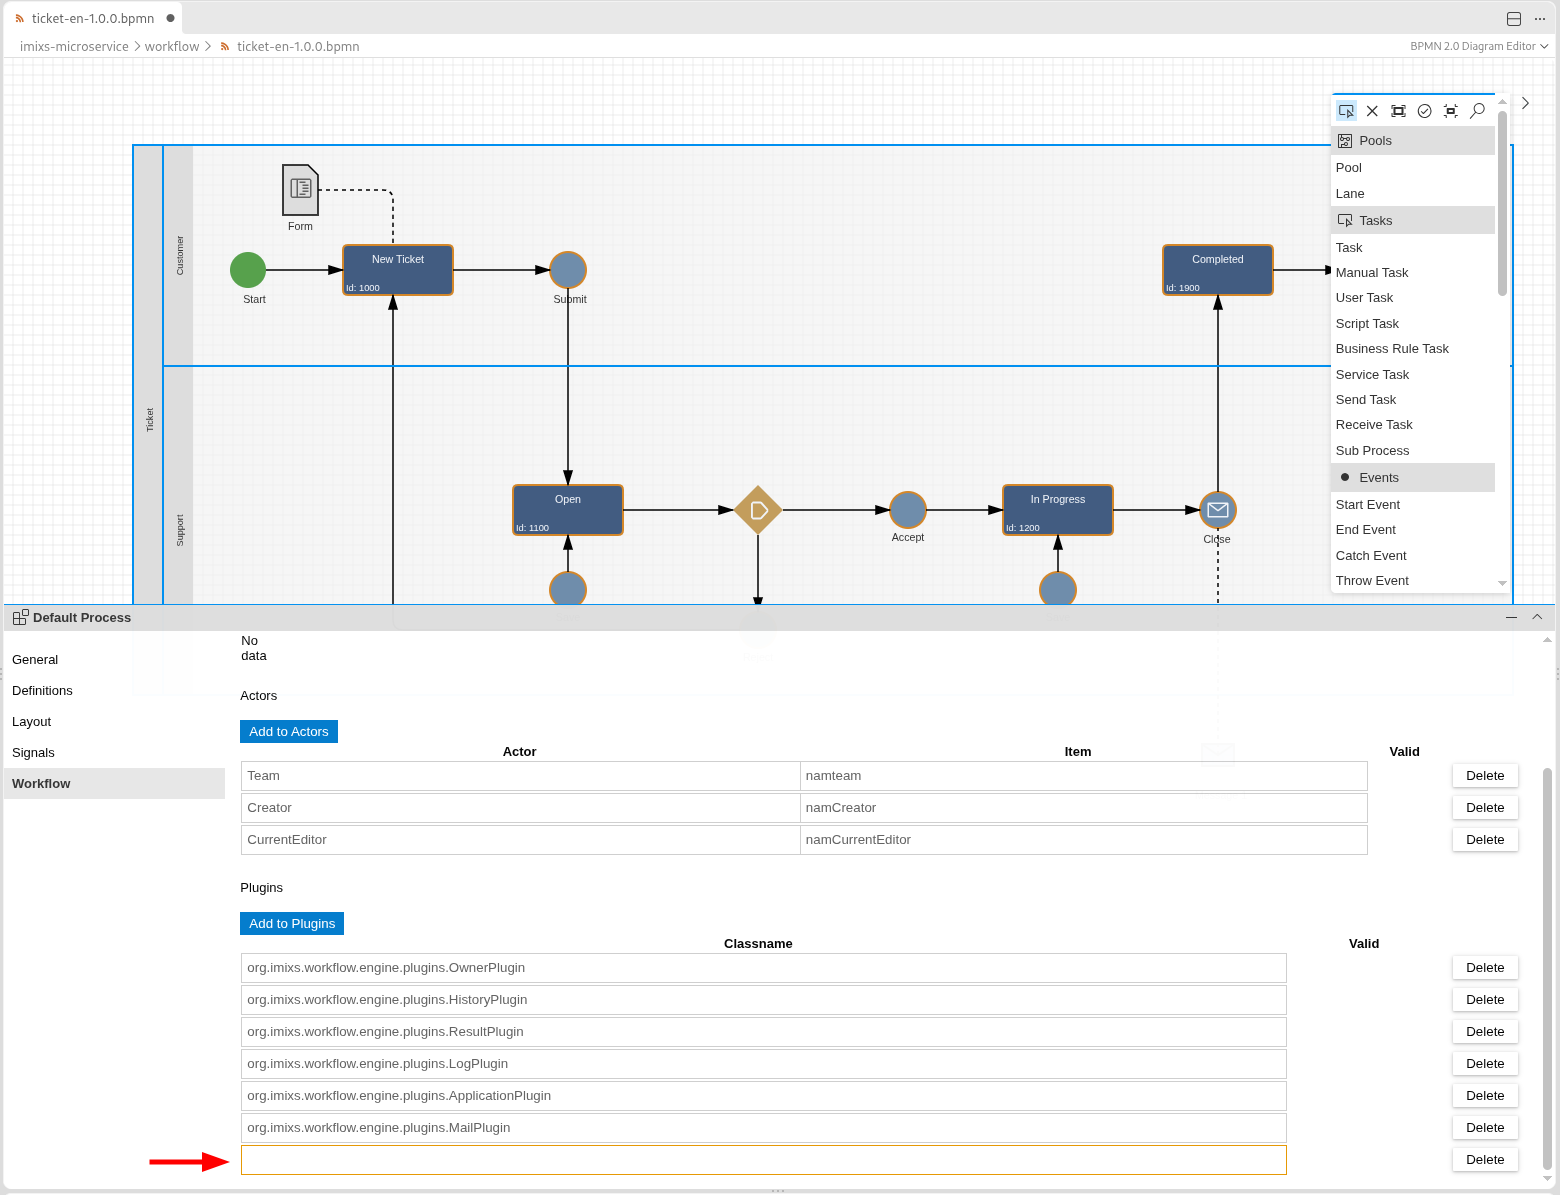
Save the model and start the stack again:
$ docker compose up
The model is loaded automatically during startup, because the stack is configured to overwrite the BPMN models.
Step 7 - See the Result
Open the web app, create a new ticket and trigger an event in your workflow. The Plugin will now been executed. You can verify this in two ways.
First, look into the log of the engine. The Plugin writes the available model versions:
$ docker compose logs app
Look for lines like ModelVersion found: ....
Second, check the process instance. The Plugin added a new item with the name _some_item. Open the Imixs-Admin client at http://localhost:8888 and connect it to the engine with the URL http://app:8080/api [CHECK: login and how to open the process instance]. In the process instance you will find the item _some_item with the value Hello World.
You can also request your tasks with the REST API:
http://localhost:8080/api/workflow/tasklist/creator/admin
The result contains the item _some_item as well. This is data your Plugin added to the process instance, and the engine stores it together with the form data.
Step 8 - Make Your Own Change
Now change the Plugin. Replace the method run() with a simple validation:
public ItemCollection run(ItemCollection workitem, ItemCollection adocumentActivity) throws PluginException {

    // read the city entered in the form
    String city = workitem.getItemValueString("city");

    if (city.isBlank()) {
        // set a default value
        workitem.setItemValue("city", "London");
    }

    // continue processing
    return workitem;
}
The new plugin will set the item ‘city’ to the value ‘London’ if not filled out.
Build the image again with the same command as in Step 4, stop the stack with Ctrl+C and start it again with docker compose up. Now run a new worklfow with an empty city input and your plugin will set the default value.
A Plugin can also stop the processing if you found invalid or missing data:
public ItemCollection run(ItemCollection workitem, ItemCollection event)
        throws PluginException {

    // set a default  the subject entered in the form
    String city = workitem.getItemValueString("city");

    if (city.isBlank()) {
        // interrupt the processing life-cycle and roll back the transaction
        throw new PluginException(DemoPlugin.class.getSimpleName(), "MISSING_DATA",
                "Please enter a city");
    }

    // continue processing
    return workitem;
}
This is the transactional behavior of the engine: either the whole processing step succeeds, including all Plugins, or nothing is changed.
What You Have Learned
- The Imixs-Microservice is the engine that runs your models and publishes the REST API.
- A Plugin is a Java class that the engine executes each time a BPMN event is processed.
- You bind a Plugin to an event in the BPMN model. The code and the process stay separated.
- A Plugin can change data or stop the processing, and the engine takes care of the transaction.
What's Next?
- Learn more about the extension mechanism: The Plugin API, the Adapter API and the Core API describe the microkernel architecture behind it.
- Start your own project: Instead of changing the example project, set up a separate Maven project that extends the Imixs-Microservice as an overlay, with your own name and your own image. See the section “Extend the Imixs-Microservice” in the project README.
- Call the engine from your own application: See the Imixs REST API.
Documentation
Core Concepts
Building Applications
Operations
Project
Community
