How to get Started with Imixs Workflow
In this tutorial you will set up your own Imixs-Workflow project and model your first workflow. Imixs-Workflow is an open source BPMN 2.0 workflow engine for Jakarta EE and microservice architectures. You model your business process visually, and the engine executes it. In this tutorial you will learn :
- How to run Imixs-Workflow with Docker
- How to install the Open-BPMN modeler
- How to change a form and a workflow in your BPMN model
- How an event-driven workflow works
Before you get started, ensure you have:
- Git
- Docker
- Visual Studio Code (only needed to edit models, see Step 3)
You do not need to write any Java code in this tutorial. If you want to learn how to extend the Imixs Workflow engine follow Tutorial Part-2.
Step 1: Setting Up Your Development Environment
The easiest way to get started is with the Imixs starter project ‘Imixs-Forms’. Imixs-Forms is a single-page application connected to the Imixs-Workflow engine via the Imixs REST API. This lets you get familiar with the basic concepts without writing any Java code. Because the engine is accessed through a REST API, you can use any programming language for your own applications.
So first get a copy of the imixs-forms project using Git:
$ git clone --depth=1 https://github.com/imixs/imixs-forms.git my-project
$ cd my-project && rm -rf .git
To run your project you just need to start the docker compose stack. If not yet installed see the official install guide.
Start the demo with:
$ docker compose up
The docker-compose.yaml file expects a data directory ./models/ providing your BPMN models to be automatically imported during startup. You can add later your own BPMN models here.
.
├── docker-compose.yaml
└── models/
    └── ticket-en-1.0.0.bpmn
Our Environment now starts a Postgres Database and the Imixs-Workflow Microservice. We will use the microservice to interact with the workflow engine. You will get an overview about the Imixs-Microservice if you open the following URL in your Web Browser:
Step 2: Test your Imixs-Forms App
The Imixs-Forms project provides you with a single-page application based on HTML and JavaScript. You can test the application from your Browser with the following URL:
http://localhost:8080/app/?modelversion=ticket-en-1.0&taskid=1000
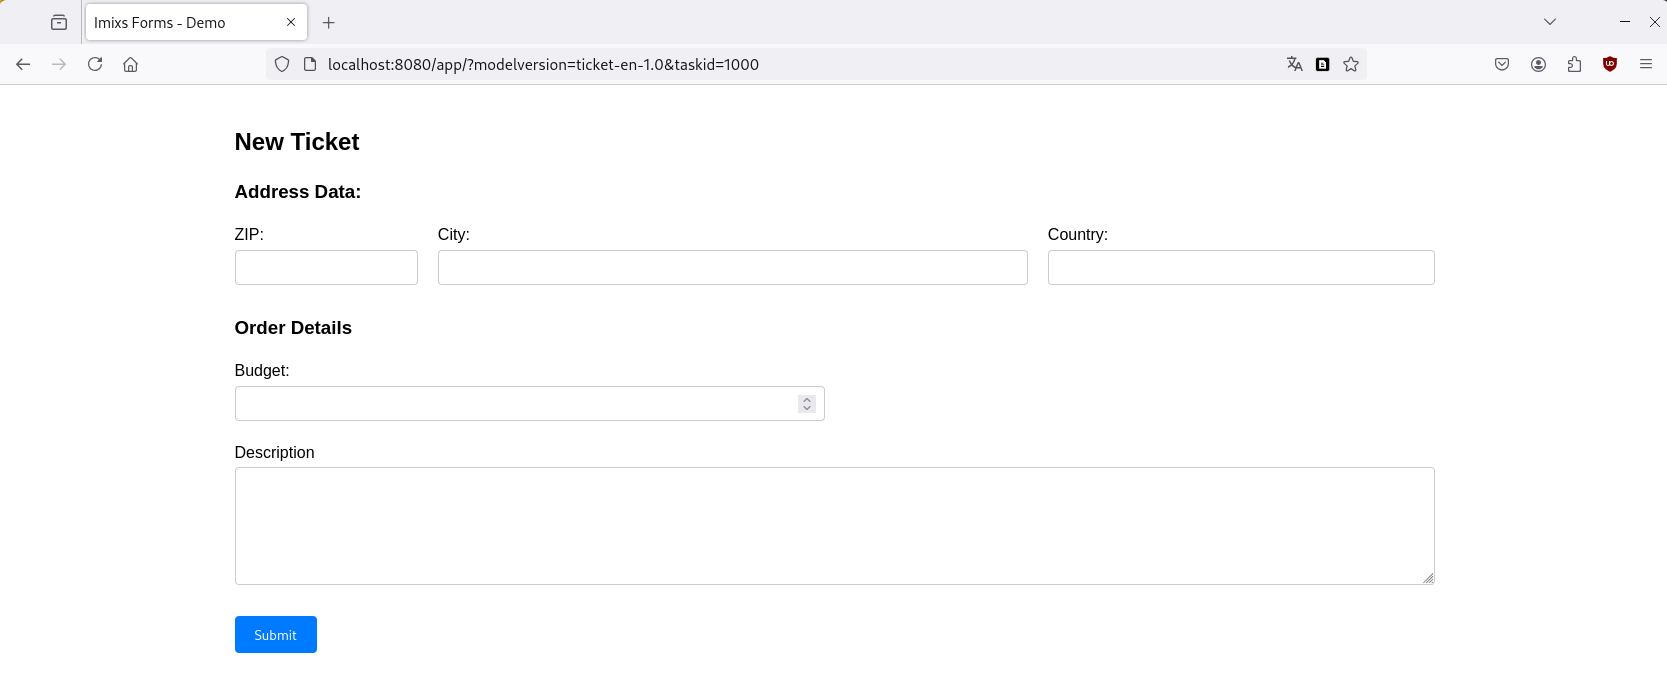
Your browser will ask you to log in. Use the default test user admin with the password adminadmin.
The application shows a Web Form with some input elements and a submit button. The submit button will already trigger the Workflow Engine and creates a new so called ‘process instance’.
That's it - your Imixs-Workflow project is up and running. Next let's see how to model a BPMN model.
Step 3: Create your own Model
Before we can start modelling you need to install Visual Studio Code. If you have not yet installed Visual Studio Code just follow the official install guide.
Next go to the ‘Extensions’ section and search for ‘Open-BPMN’. Install the extension. Now you are ready to open your BPMN models. Just open your project with File > Open Folder... and you can access the BPMN Models:
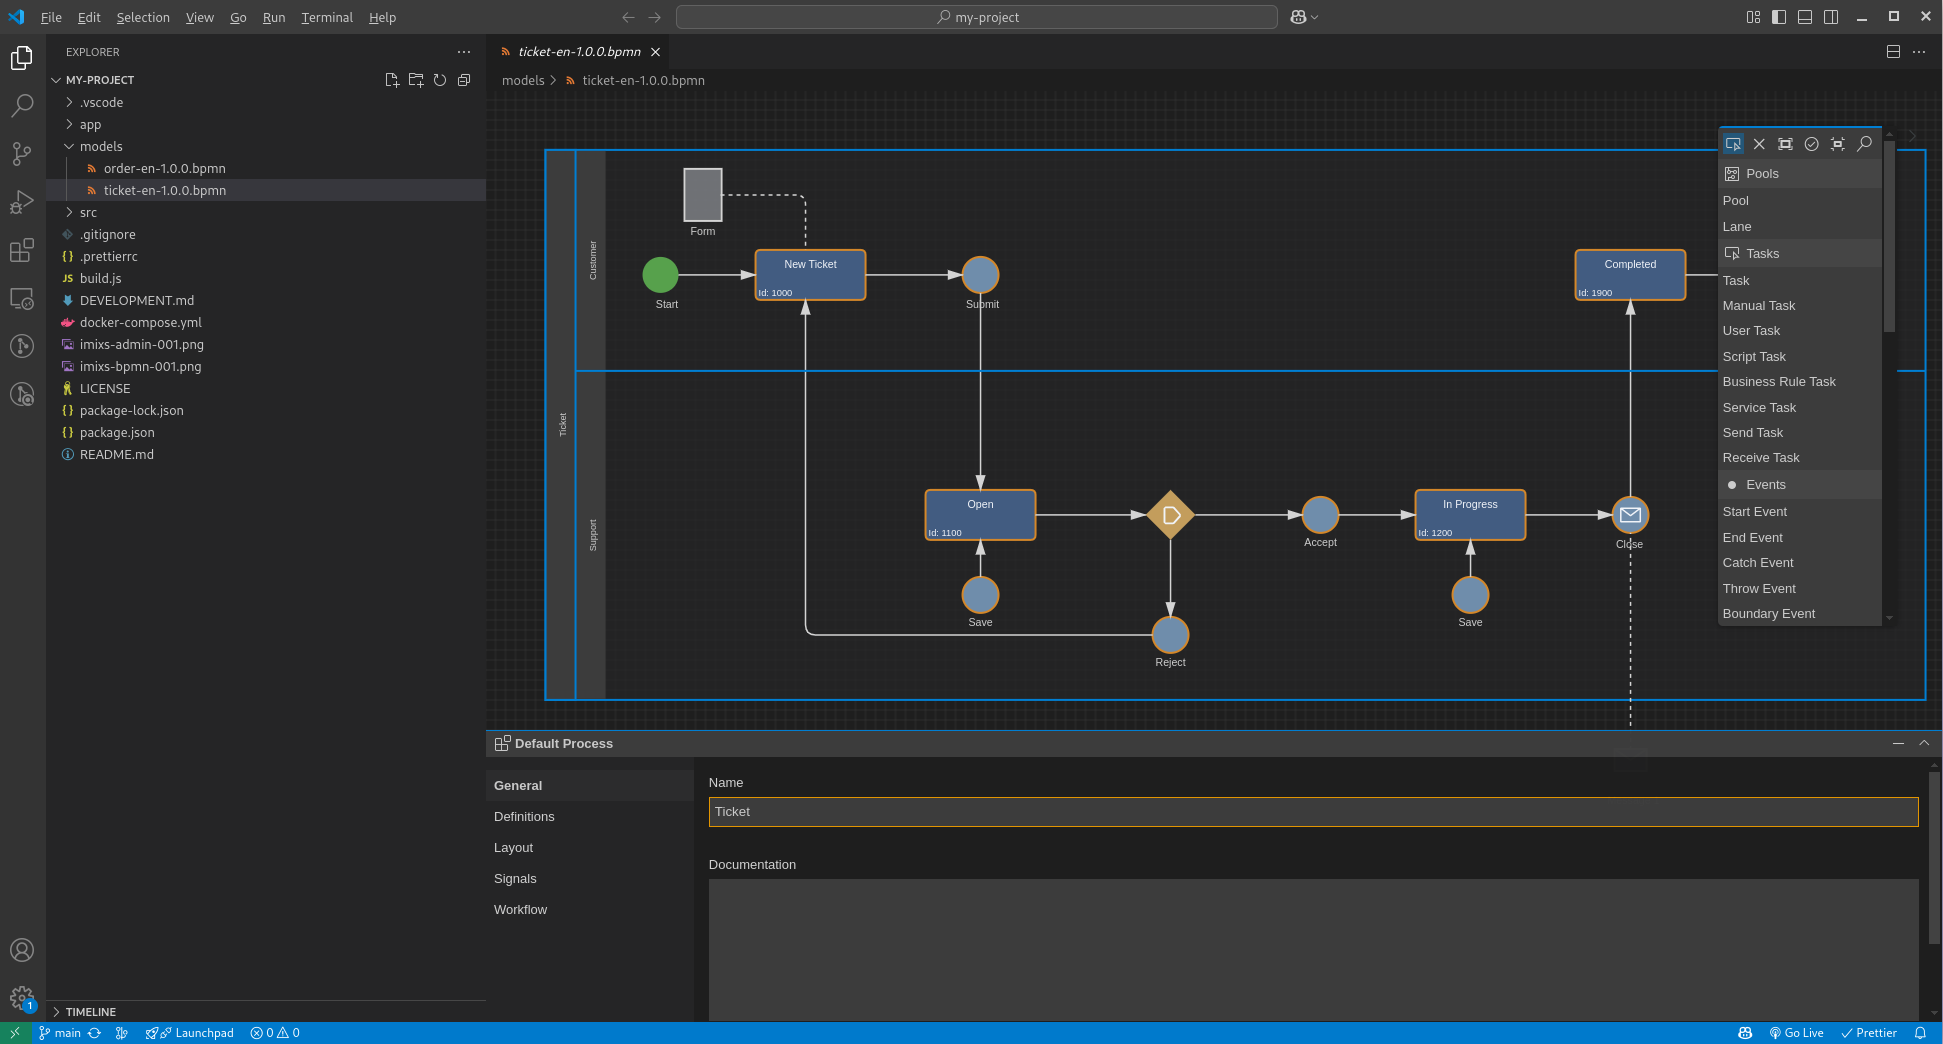
Now let's see how the Imixs BPMN Model works. If we take a closer look at the ticket-en-1.0.0.bpmn model you can see a BPMN Start Element (green cycle) and a BPMN Task element (blue box) named ‘New Ticket’.
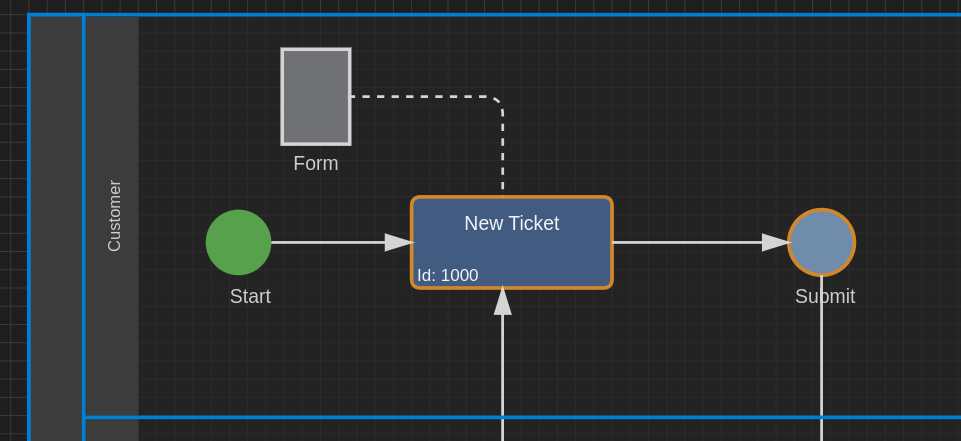
The start element defines where the workflow get started. The Task element defines the initial state of a new Process instance. And the BPMN Data Element named “Form” defines the Input Fields in your Web Form. If you double click on the Data Element you will see the form definition:
<?xml version="1.0"?>
<imixs-form>
  <imixs-form-section label="Address Data:"> <!-- each section has 12 columns -->
    <item name="zip" type="text"  label="ZIP:" span="2" />
    <item name="city" type="text"  label="City:" span="6" />
    <item name="country" type="text"  label="Country:" span="4" />
  </imixs-form-section>
  <imixs-form-section label="Order Details">
    <item name="budget" type="currency"  label="Budget:" span="6" />
    <item name="details" type="html" label="Description" />
  </imixs-form-section>
</imixs-form>
Lets see how we can add a new input field.
Add the following line below the item “budget”
...
<item name="costcenter" type="text"  label="Cost Center:" span="4" />
...
Save the Model and restart your Docker stack (stop it with ‘ctrl + c’)
Now you will see a new Input Field named “Cost Center” beside the Budget field.
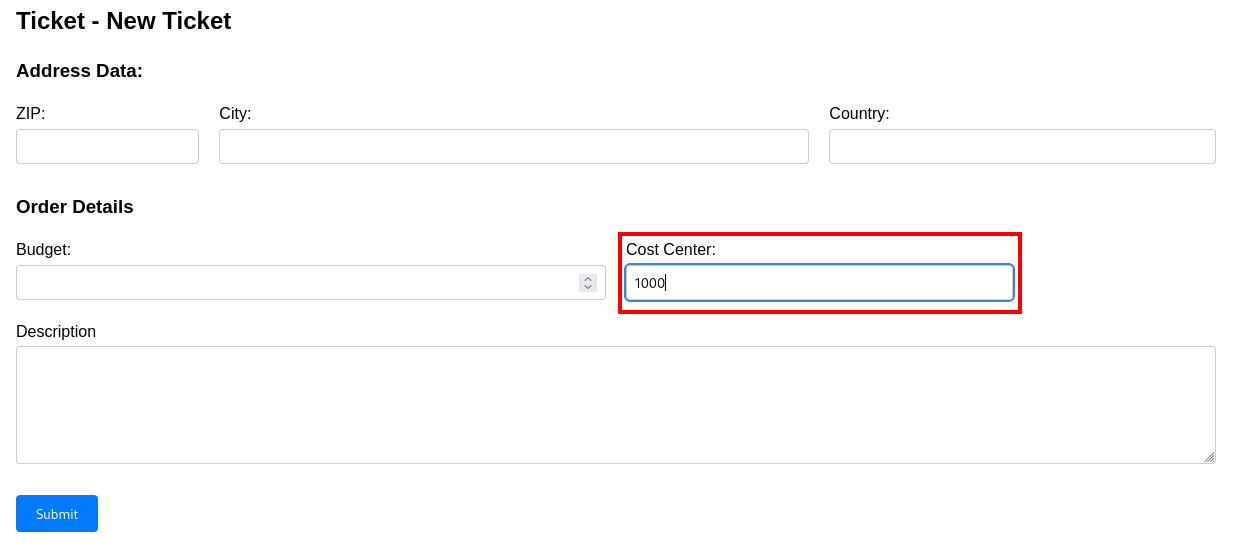
The Imixs-Workflow Engine will automatically store the field values in a new process instance and we can use this information for further processing steps.
Now lets see what happens when we click on the “Submit”. In the BPMN event you can see the Submit button is defined as an BPMN Catch Event. And the event is connected by a sequence flow with the Task named “Open”
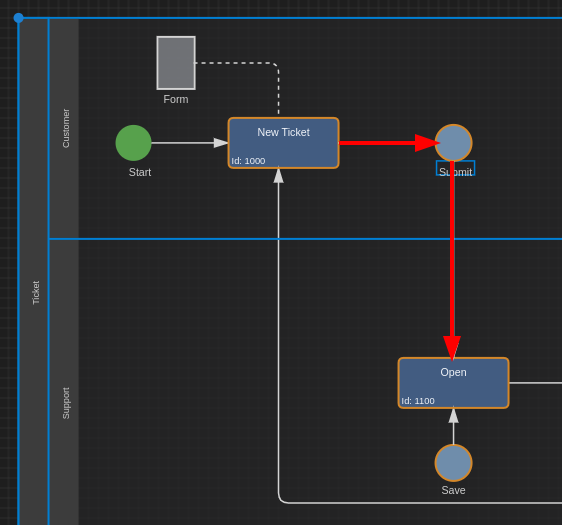
This means, when you click the “Submit” button the corresponding event in your model will be triggered and the Workflow Engine will change the state of our Process Instance from “New Ticket” into “Open”. You can see this effect in the headline of our web form. And also you will notice that new Buttons are shown up:
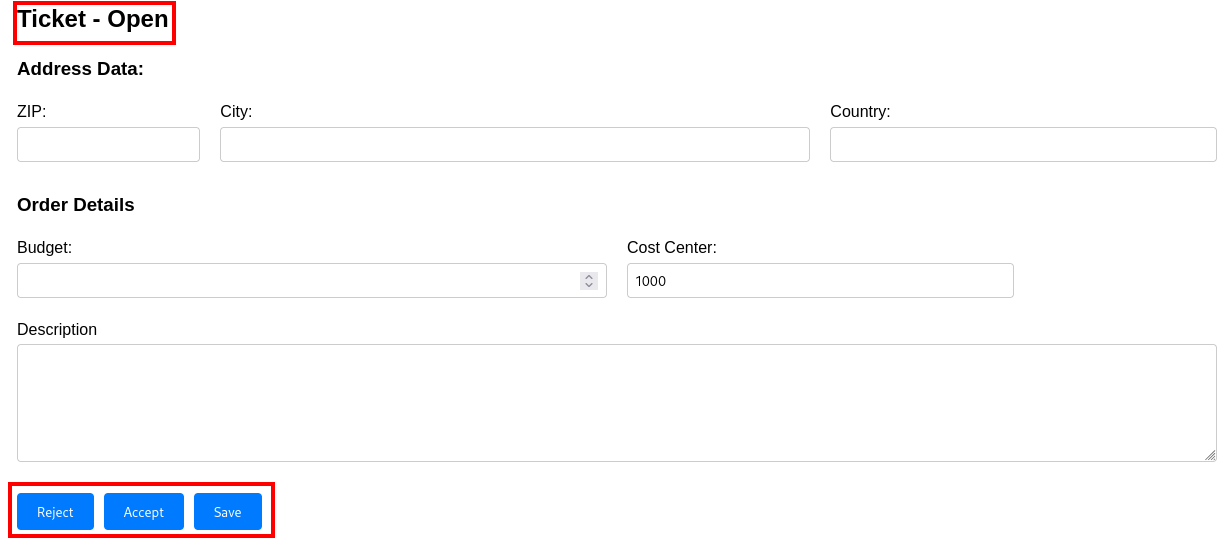
The buttons you see are the corresponding BPMN Events in our model connected with the Task “Open”. Each of the events defines a new transition from one status into another or just stay in the same status (as in the ‘save’ event)
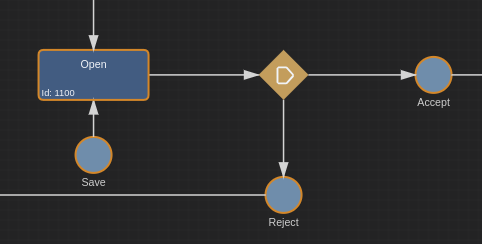
This is called a “Event Driven Workflow”. Each BPMN Event defines what happens if the user triggers the event. Each event can change the status in our process flow and also trigger different backend services as we will see later.
What You Have Learned
- Imixs-Workflow runs as a Docker service, started with a single command.
- A BPMN model defines the process and the input form. Change the model, restart, and your form changes with it.
- Each BPMN event is an action the user can trigger. The engine moves the process instance from one task to the next. This is the event-driven workflow.
All of this came from your model, without writing any Java code.
What's Next?
Depending on what you want to build, there are three ways to continue:
- Learn how to Extend the Engine with Plugin and Adapter classes in Tutorial Part-2
- Call the engine from your own application. The REST API works with any programming language. See the Imixs REST API.
- Add your own business logic with Java. Plugins run your code when an event is triggered, for example to validate data or to call another service. See the Plugin API.
- Embed the engine in a Jakarta EE application. See Imixs-Workflow and Jakarta EE.
If you want to know why a workflow engine saves you work, read Why should I use it?
Documentation
Core Concepts
Building Applications
Operations
Project
Community
